A dripping or malfunctioning Delta faucet can be a constant annoyance, but the good news is that most issues stem from a worn-out cartridge – a component that’s surprisingly easy to replace yourself. This comprehensive guide will walk you through the process step-by-step, helping you save money on plumber fees and restore your faucet to perfect working order.
Why Your Delta Faucet Might Need a New Cartridge
The cartridge is the heart of your Delta faucet, responsible for controlling water flow and temperature. Over time, due to daily use, mineral buildup from hard water, or general wear and tear, the internal seals and components within the cartridge can degrade. This leads to common problems such as:
- Constant Dripping: The most common sign of a failing cartridge. If your faucet continues to drip even when fully turned off, the cartridge isn’t creating a proper seal.
- Difficulty Operating the Handle: A stiff, loose, or sticky handle often indicates issues within the cartridge.
- Uneven Water Flow or Temperature Fluctuations: If your water pressure is inconsistent or the hot/cold mix is erratic, the cartridge might be failing to regulate flow effectively.
- Leaking Around the Handle Base: Water seeping from the base of the handle suggests that internal seals are compromised.
- Squeaking or Grinding Noises: These sounds during operation can point to friction within a worn cartridge.
What You’ll Need: Tools and Supplies
Before you begin, gather the following tools and supplies to ensure a smooth replacement process:
- New Delta Faucet Cartridge: This is crucial. Delta faucets use various cartridge types (e.g., single-handle, two-handle, different series like 1300/1400 or 13/14 MultiChoice™). You MUST identify the correct cartridge for your specific Delta faucet model. Look for the model number on your faucet or consult Delta’s website (deltafaucet.com/service-parts) or parts diagrams. Taking the old cartridge to a plumbing supply store is also a good way to ensure a match.
- Allen Wrench Set (Hex Keys): Most Delta faucet handles are secured with a set screw that requires an Allen wrench.
- Screwdriver (Phillips or Flathead): Depending on your faucet model.
- Adjustable Wrench or Channel Lock Pliers: For unscrewing the bonnet nut that holds the cartridge in place.
- Needle-Nose Pliers: Useful for removing small parts like springs and seats, if applicable.
- Plumber’s Grease (Silicone Grease): A small amount of this lubricant helps new O-rings and seals seat properly and extends their life.
- Rag or Towel: For wiping up water and protecting your workspace.
- Small Bucket or Container: To catch any residual water when disconnecting lines.
- Flashlight (Optional but Recommended): For better visibility under the sink.
Step-by-Step Guide to Replacing Your Delta Faucet Cartridge
The exact steps can vary slightly depending on your Delta faucet model (single-handle vs. two-handle), but the general process remains similar.
Step 1: Turn Off the Water Supply
This is the most critical step. Locate the hot and cold water shut-off valves directly underneath your sink. Turn both valves clockwise until they are fully closed. If your sink doesn’t have individual shut-off valves, you’ll need to turn off the main water supply to your house.
After turning off the water, open the faucet handle to drain any residual water from the lines. This will also confirm that the water supply is indeed shut off.
Step 2: Remove the Faucet Handle
Most Delta faucet handles are secured by a set screw.
- For single-handle faucets: Look for a small cap or button (often red/blue for hot/cold indication) on the handle. Carefully pry this off with a small flathead screwdriver or your fingernail. Beneath it, you’ll find the set screw. Use the appropriate size Allen wrench to loosen (don’t remove completely) the set screw. Once loose, the handle should lift straight off.
- For two-handle faucets: The set screw is usually located on the side or back of the handle. Locate and loosen it with an Allen wrench, then pull the handle straight up.
Step 3: Remove the Decorative Cap/Bonnet Nut
Once the handle is off, you’ll see a decorative cap or a bonnet nut that secures the cartridge.
- Decorative Cap: Some models have a decorative cap that twists off by hand or requires gentle prying with a flathead screwdriver.
- Bonnet Nut: Most Delta faucets have a large brass or plastic bonnet nut that holds the cartridge in place. Use your adjustable wrench or channel lock pliers to carefully unscrew this nut counter-clockwise. Be gentle to avoid damaging the finish.
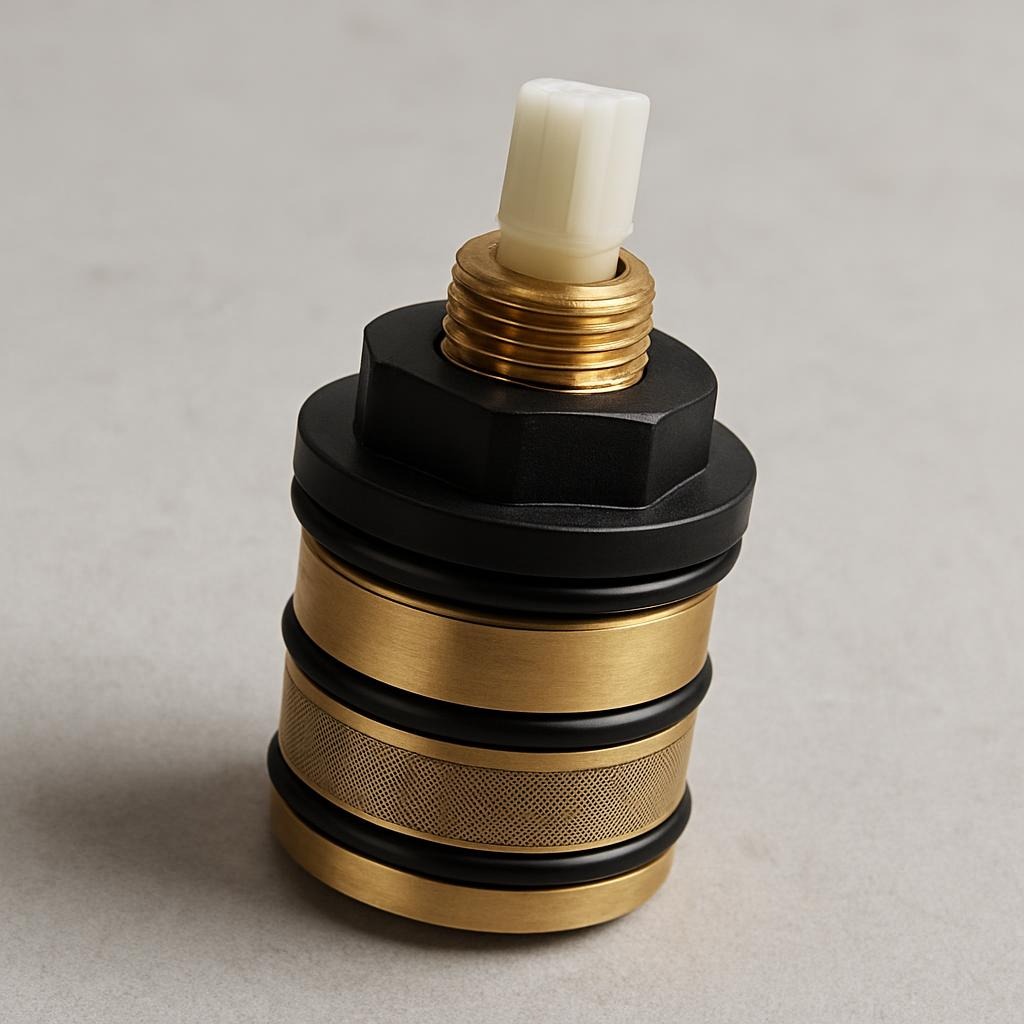
Step 4: Extract the Old Cartridge
With the bonnet nut or cap removed, the cartridge should now be exposed.
- Single-Handle Cartridges: These often have “keys” or tabs that align with slots in the faucet body. You might be able to pull the cartridge straight out by hand. If it’s stuck, you can try gently wiggling it side-to-side, or use needle-nose pliers to grasp the top of the cartridge and pull upwards. Some older Delta cartridges (especially “ball” type faucets) may have an internal ball and spring/seat assembly that needs to be removed with needle-nose pliers.
- Two-Handle Cartridges (Stem Units): These typically twist out. Grip the stem unit with pliers and turn counter-clockwise to remove it. You may also find a small rubber seat and spring at the bottom of the valve body; these should also be replaced.
Important Note: Pay attention to the orientation of the old cartridge as you remove it. Many cartridges have a specific way they need to be reinstalled (e.g., “Hot Side” marking, specific tab alignment).
Step 5: Clean the Faucet Body
Before installing the new cartridge, take a moment to clean any mineral deposits, debris, or old grease from inside the faucet body. A small brush or even an old toothbrush can be helpful. This ensures a clean seating for the new cartridge and prevents future issues.
Step 6: Install the New Cartridge
- Apply Plumber’s Grease: Apply a thin, even coat of plumber’s grease to the O-rings and any other rubber seals on the new cartridge. This lubricates the seals, making installation easier and prolonging the cartridge’s life.
- Insert the New Cartridge: Carefully insert the new cartridge into the faucet body, ensuring it’s oriented correctly (refer to how the old one was removed, or look for alignment tabs/markings like “Hot Side”). It should slide in smoothly and seat firmly. If you removed springs and seats, ensure they are correctly positioned in the valve body before inserting the cartridge.
- Secure the Cartridge: Reinstall the bonnet nut or decorative cap. Hand-tighten first, then use your adjustable wrench or channel lock pliers to snug it up. Do not overtighten, as this can damage the cartridge or the faucet body.
Step 7: Reassemble the Faucet Handle
Place the faucet handle back onto the stem, aligning it correctly. Tighten the set screw with your Allen wrench, being careful not to overtighten. Replace any decorative caps or buttons.
Step 8: Restore Water Supply and Test
Slowly turn the hot and cold water shut-off valves back on, turning them counter-clockwise. Listen for any immediate leaks.
Once the water is fully on, test the faucet:
- Check for Leaks: Look for any drips or leaks around the handle base or spout.
- Test Water Flow and Temperature: Operate the handle through its full range of motion (hot, cold, mixed, on/off) to ensure smooth operation, proper water flow, and accurate temperature control.
- Flush the System: Let the water run for a minute or two to flush out any air or debris that might have entered the lines during the repair.
If you encounter any leaks or issues, double-check that the cartridge is seated correctly and the bonnet nut is adequately tightened (but not overtightened).
Troubleshooting Common Issues
- Still Leaking:
- Incorrect Cartridge: Ensure you have the exact replacement cartridge for your Delta model.
- Improper Seating: The cartridge might not be fully seated or correctly aligned.
- Damaged O-rings/Seals: Double-check that the new cartridge’s O-rings are not pinched or damaged.
- Debris: A small piece of debris might be preventing a proper seal.
- Worn Seats and Springs (for older Delta single-handle faucets): If your faucet uses these, ensure they were replaced and installed correctly.
- Stiff Handle:
- Overtightened Bonnet Nut: Loosen the bonnet nut slightly.
- Insufficient Lubrication: Ensure adequate plumber’s grease was applied to the cartridge O-rings.
- No Water Flow or Low Pressure:
- Water Supply Not Fully Open: Ensure both hot and cold shut-off valves are completely open.
- Debris in Aerator: The aerator at the end of the spout might be clogged. Unscrew it and clean out any debris.
- Incorrect Cartridge Installation: The cartridge might not be seated correctly, blocking water flow.
When to Call a Professional
While replacing a Delta faucet cartridge is a common DIY task, there are instances where professional help might be needed:
- Inability to Shut Off Water: If your shut-off valves are seized or not working, a plumber can repair or replace them.
- Stubborn Components: If the handle set screw, bonnet nut, or old cartridge is corroded and won’t budge, a plumber has specialized tools and techniques.
- Persistent Leaks: If you’ve replaced the cartridge and still have leaks, there might be a more complex issue with the faucet body or supply lines.
- Unfamiliarity or Discomfort: If you’re simply uncomfortable performing the repair, don’t hesitate to call a licensed plumber.
By following this in-depth guide, you’ll be well-equipped to tackle replacing worn cartridges in your Delta faucets, saving time and money while keeping your home’s plumbing in top shape.
Leave a Reply