Changing filters in your commercial Reverse Osmosis (RO) system is a critical maintenance task that ensures optimal performance, water quality, and extends the lifespan of your membranes. However, neglecting a crucial preliminary step—depressurization—can lead to safety hazards, equipment damage, and a messy filter change. This comprehensive guide will walk you through the process of safely and effectively depressurizing your commercial RO system, ensuring a smooth and successful filter replacement.
Why Depressurize? The Critical Importance
Depressurizing your RO system before any maintenance, especially a filter change, is non-negotiable. Here’s why:
- Safety First: Commercial RO systems operate under significant pressure (often 100-250 PSI, or even higher). Attempting to open filter housings or connections while the system is pressurized can result in:
- Sudden Release of Pressure: This can cause components to forcefully eject, leading to serious injury (e.g., impact injuries, eye damage).
- Water Blasting: High-pressure water can cause slips, falls, and damage to surrounding equipment or the facility itself.
- Chemical Exposure: If your system uses pre-treatment chemicals, depressurization prevents their uncontrolled release during filter changes.
- Prevent Equipment Damage:
- Stripped Threads: Trying to loosen fittings under pressure can strip threads on filter housings, valves, or pipes, leading to costly repairs or replacements.
- Cracked Housings: Sudden pressure equalization can stress and crack filter housings, especially if they are older or made of certain plastics.
- Membrane Damage: While not directly related to filter changes, uncontrolled pressure fluctuations during maintenance can stress RO membranes, reducing their efficiency and lifespan.
- Easier Maintenance: Depressurized components are much easier to manipulate, making the filter change process smoother, faster, and less physically demanding.
- Minimized Water Spillage: Releasing pressure beforehand significantly reduces the amount of water that will spill when opening filter housings, leading to a cleaner work area and less cleanup time.
Understanding Your Commercial RO System’s Pressure Points
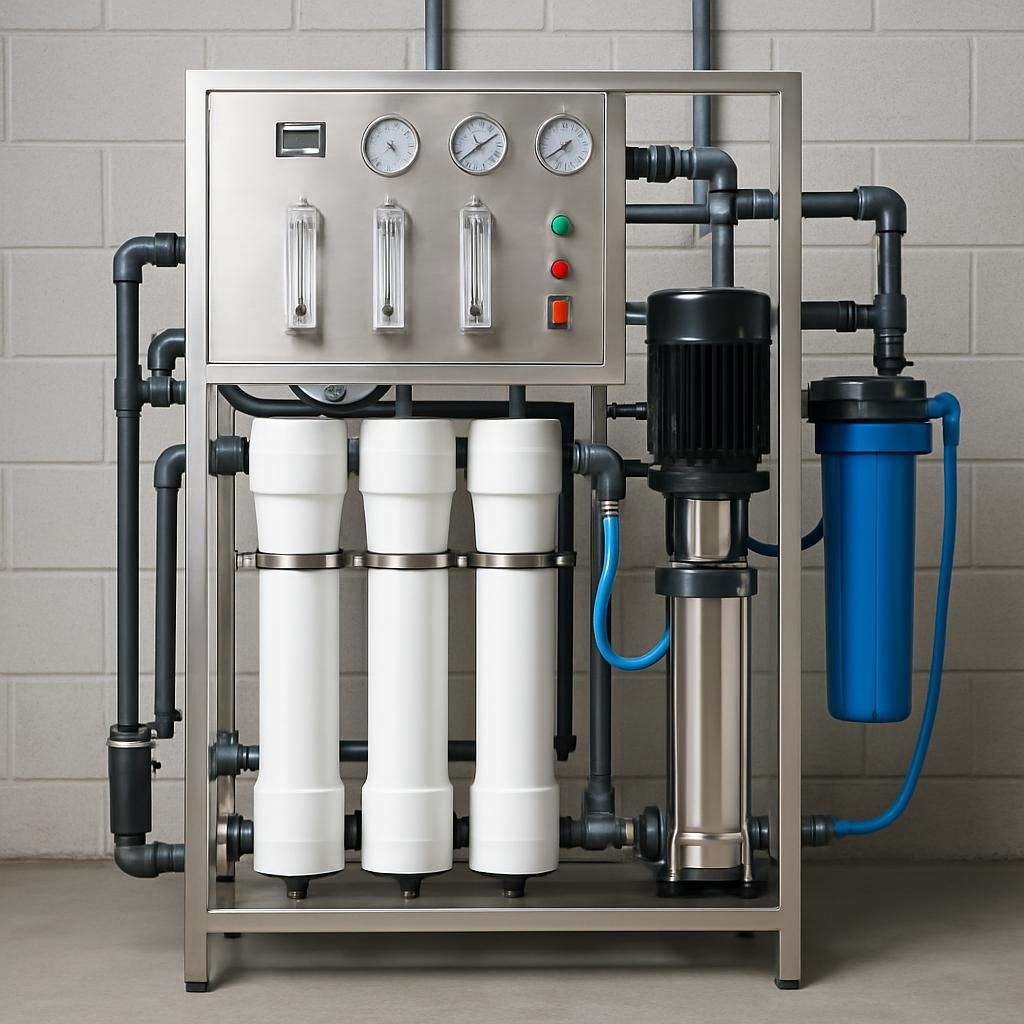
Before you begin, it’s essential to identify the key components and pressure points within your specific commercial RO system. While configurations vary, common elements include:
- Feed Water Inlet: Where raw water enters the system, often under municipal or well pressure.
- Pre-Filters (Sediment, Carbon Block): These are typically the first filters in line and will be under the highest pressure.
- RO Pump: Boosts the pressure of the water before it enters the RO membranes.
- RO Membranes/Housings: The core of the RO system, where the purification occurs. These will also be under high pressure.
- Pressure Gauges: Crucial for monitoring system pressure at various stages (inlet, before/after pre-filters, before/after pump, concentrate, permeate).
- Valves: Ball valves, needle valves, and check valves are used to control water flow and isolate sections of the system.
- Drain/Flush Valves: Often located on the concentrate line or at the lowest point of the system for draining.
The Step-by-Step Guide to Depressurizing Your Commercial RO System
Always consult your RO system’s specific operation manual for detailed instructions and safety warnings before proceeding. If you are unsure, contact a qualified technician.
Required Tools & Materials:
- Appropriate filter housing wrench (if applicable)
- Buckets or drain pans
- Towels or absorbent pads
- Safety glasses
- Gloves (optional, but recommended for cleanliness)
Depressurization Procedure:
- Isolate the System (Shut Off Feed Water):
- Locate the main feed water supply valve to your RO system (this is typically a ball valve before your pre-filters).
- Slowly close this valve completely. This stops the flow of incoming water and prevents further pressurization.
- Verification: Check the pressure gauge at the feed water inlet. It should begin to drop.
- Shut Down the RO Pump (If Applicable):
- If your system uses a booster pump, turn it off. This can usually be done via a dedicated power switch on the pump itself or a control panel.
- Verification: Listen for the pump to stop running.
- Relieve System Pressure: This is the most critical step. There are several ways to achieve this, and the best method depends on your system’s design:
- Method A: Open a Drain Valve (Most Common & Recommended):
- Locate a drain valve or flush valve on the RO system. This is often found on the concentrate (reject) line or at a low point in the system.
- Slowly open this valve. You will hear and see water flowing out. Allow the water to drain until the pressure gauges on the system (especially before the pre-filters and at the RO membrane housings) read zero (0 PSI).
- Benefit: This method not only depressurizes but also flushes out some standing water, making for a cleaner filter change.
- Method B: Open a Permeate/Product Water Faucet/Valve:
- If your RO system feeds a holding tank or a dedicated faucet, opening that faucet or valve will allow the stored pressurized water to flow out, relieving pressure in the system.
- Caution: This might only relieve pressure on the product water side, so ensure you monitor all relevant pressure gauges. You might still need to use Method A for pre-filter pressure relief.
- Method C: Using Bleed Valves on Filter Housings (Less Common/Specific Cases):
- Some filter housings have a small “bleed” button or screw on the top. Pressing or unscrewing this will release pressure from that specific housing.
- Caution: This is typically for individual housing depressurization and may not depressurize the entire system adequately. It’s often used in conjunction with other methods.
- Method A: Open a Drain Valve (Most Common & Recommended):
- Verify Zero Pressure:
- Crucially, check all accessible pressure gauges on your RO system. Ensure they all read zero (0 PSI) or are as close to zero as possible.
- Attempt to gently loosen a filter housing. If there’s any resistance or a hiss of air/water, do not proceed. Re-check your depressurization steps.
- Prepare for Filter Change:
- Once confirmed depressurized, place buckets or drain pans underneath the filter housings you intend to open to catch any residual water.
- Have your new filters ready.
Troubleshooting Common Depressurization Issues
- Pressure Not Dropping:
- Check main feed valve: Is it fully closed?
- Check for bypass valves: Is there a bypass valve around the RO system that is open, allowing water to continue flowing?
- Clogged drain line: Is your drain valve or line clear?
- Faulty gauge: Is the pressure gauge itself malfunctioning?
- Water Still Hissing/Spraying When Opening Housing:
- You did not fully depressurize. Close the housing immediately and re-start the depressurization process from Step 1. Do NOT force it open.
Best Practices for Optimal RO System Maintenance
- Regular Maintenance Schedule: Follow the manufacturer’s recommendations for filter changes. This prevents excessive pressure build-up due to clogged filters.
- Keep Records: Document filter change dates, pressure readings, and any maintenance performed.
- Stock Spare Filters: Having the correct replacement filters on hand prevents downtime.
- Professional Assistance: For complex issues or if you’re unsure about any procedure, always call a qualified commercial RO system technician.
- Understand Your System: Familiarize yourself with the layout, valve locations, and normal operating pressures of your specific RO system.
Conclusion
Depressurizing your commercial RO system before a filter change is not just a recommendation; it’s a fundamental safety and operational requirement. By diligently following these steps, you can ensure the safety of personnel, prevent costly equipment damage, and streamline your maintenance process. Regular, proper maintenance, including thorough depressurization, is key to the longevity and efficient operation of your commercial Reverse Osmosis system, guaranteeing a consistent supply of high-quality purified water for your business needs.
Leave a Reply